1. There's no quick and simple repair job onboard - They all seem to escalate.
The above statement is Scorpio's Law #2. And by the way, Scorpio's Law #1 is: "Murphy was an optimist".
In September 2004, having returned to Scorpio on the hard in Deltaville Yacht Yard I decided to replace the cutless bearing. Why? Well, there were hurricanes (Bonnie, Charley, Francis, Ivan, Jeanne, Karl ...) arriving almost at the frequency of mosquitoes at dawn, so I was in no hurry to launch the boat. Also I had felt some vibrations in the shaft area the previous spring on our way north from Central America. Although I did not feel any play now when rocking the shaft I decided to replace it anyway, as it was several years since the last time it was done, 1993 in St. Martin. (Since then the shaft had been replaced twice! But there's a separate story about that.)
Also, I needed to replace the packing nut of the stuffing box, and therefore the shaft had to be pulled out of the coupling anyway, so I might as well use the opportunity to pull it out the whole distance through the cutless bearing. The last reason for starting the job was the one referring to the subject of this story: This year we had no irregular major jobs scheduled for our annual haul out. "Only" the normal projects of washing and waxing the topsides, sanding and painting the bottom with anti-fouling paint, servicing the sea cocks etc. Therefore I thought I could squeeze in some odd jobbs. Of course I should have known better.
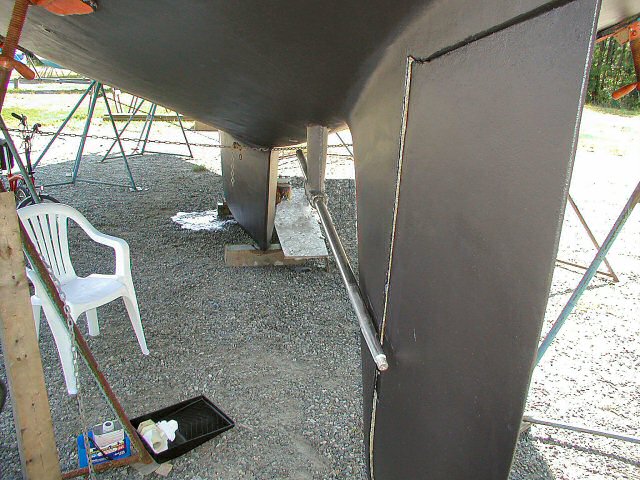
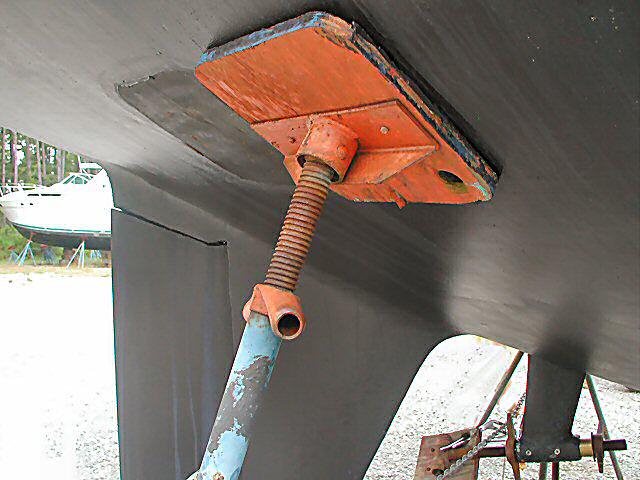
Having said that, now that it's all over, I'm glad that I vent through all the trouble. The whole project finally included pulling out the shaft using a home made jack rig, cutting out the stuffing box with a knife and sawing the cutless bearing out of the strut. And then replacing and installing new parts in place of the broken stuff. Plus sending the propeller to a work shop for inspection. The propeller had to be taken off the shaft anyway to allow withdrawal past the skegg (see photo below) and I figured that maybe the vibrations I had felt were caused by an unbalanced propeller. The process sounds simple, but the project lasted several days. Not only were the jobs difficult, but they also returned the wrong propeller!
Here's how the process developed:
The
propeller shaft is stuck
The stuffing box won't come off
The cutless bearing is jammed
Squeezing in the new cutless
bearing
2. Use your existing resources - both mental and physical.
The mental source is, naturally, your imagination; the physical is not your muscle strength, but can be, for instance, all kinds of crap lying around the yard.
During the years I have learned that almost all problems, concerning repair and maintenance of boats, can be solved by your self and it helps to approach them from unconventional angles. When you've kicked the problem and ideas to solve it around at some length and in some detail you should eventually get to the solution. To me that frequently happens at 3 o'clock in the morning and I suddenly wake up. Although many projects involve some ugly words I usually try to tell myself that I'm sailing all the time (even though the yacht would be high and dry on a ship yard). And there are few things more rewarding for a person with a non craftsman or technical background than solving these problems using your own mind and your own hands. Scorpio's Law #3: Cruising is boat repair in exotic locations.
Back to Virginia, September 2004. Even though I've had the shaft out just one year ago it was stuck so hard inside the coupling that I had to be really imaginative to get it out. I constructed a big jack assembly using a car jack, a jack stand, some big pieces of lumber and a heavy stainless wire. The idea was to attach the wire around the 3 bladed propeller (still attached to the shaft) and use the jack to pull out the shaft. However, we had no strong point behind the stern of the boat where to pull from. Therefore I built a vertical platform behind the stern using a jack stand and pieces of lumber. This way the pulling forces would be directed against the hull of the boat and the ground. All items used were found lying around the yacht yard. The jack I had found there a couple of years earlier and successfully used for breaking out the mast step (there is a separate story about that project) . But you could borrow this kind of a jack from any automobile owner.
Unfortunately I don't have a photo of this construction, but this sketch on the left below illustrates the idea.[Click on the image for a larger sketch, which opens in a new window. Then close that window to proceed]Drawing pending |
|
Our jack arrangement pulling out the shaft. |
The alignment of the
shaft is 7º
off the center line |
Breaking the stuffing box loose
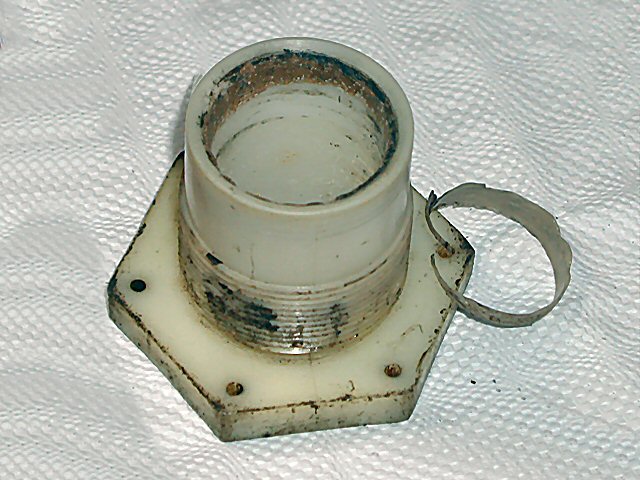
The main reason for pulling out the shaft in the first place, an operation which escalated into all these other sub projects, was the fact that last year securing the packing nut caused the shaft and stuffing box to over heat. I first discovered this in September 2003 after I had asked the yard in Honduras to repack the stuffing box. Apparently the nut (made of some kind of plastic) was too tight and thus there was too much friction between it and the shaft. The only way to avoid over heating was to keep the packing nut unscrewed to the box, and let the screw just rotate with the shaft. Because the nut is there to keep the packing material in place this solution involved the risk for a sudden major leakage. Strangely we did not experience any more dripping during the whole of that season than there should be with a secured nut (there should be a couple of drops a minute for lubrication), which made me wonder a bit. |
|
| The friction between the packing nut and
the shaft had melted the inner surface of the nut |
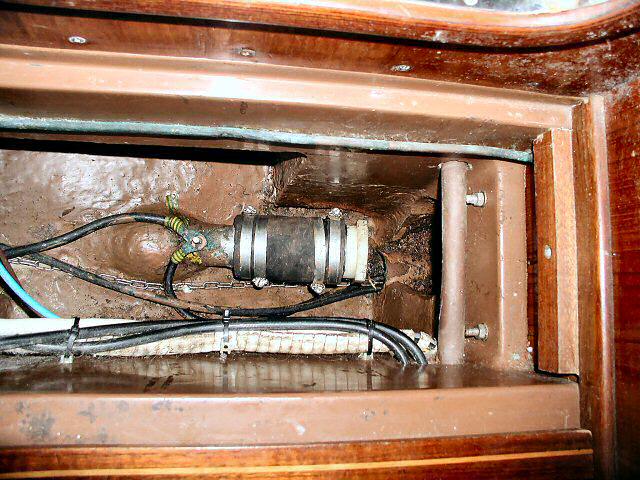
The old stuffing box after the removal of
the shaft before breaking the box. One bracket, preventing the housing to turn with the shaft, is already taken out. |
|
|
Parts of the stuffing
box: hose and cylinder |
The stern tube after removal of the
rest of the box |
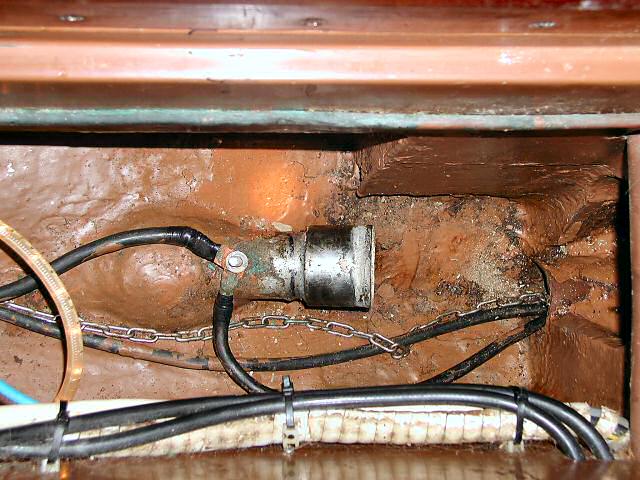
Stuffing boxes were originally developed in the Netherlands several hundred years ago for sealing bearings on wind pumps. Having been around for centuries the stuffing box is a simple device, but it requires regular attention to perform properly. From time to time the packing has to be renewed, but the hardest part of the job is generally getting the old packing out. I suspect most cruisers therefore just add more packing as the old wears. However, with time old packing hardens and there is a risk that it scores the shaft when tightened up. With a deep awkwardly placed stuffing box it is next to impossible to pick out the inner wraps of packing.
|
|
| Cylinder and packing nut.
Old hardened
packing can be seen inside the cylinder. |
|

So, here I was, wondering whether I should just change the packing nut to a wider one, as was the original idea, or clean out all old packing and repack the box. The escalator accelerated and I started to try to pick out the old rings now that the shaft was out of the way. No chance! It was not only next to impossible, but completely impossible. The rings did not move and they felt like hard plastic. Then I unfastened the four hose clamps, two holding the hose to the stern tube and the other two holding it to the stuffing cylinder. I could not get the hose loose from neither the stern tube nor the cylinder. With time rubber hoses go hard and does not flex at all. Having come this far there was no going back. I drew a deep sigh and let the escalation of the project go further, starting to cut through the hose and breaking the stuffing box loose.
EPILOGUE: Also the new packing nut got hot and "melted" and I had to haul out again a week after being launched. Then I installed a new stuffing box of bronze, which appeared to work just fine for a couple of years, although I wondered about the need to have quite a lot of lubricating water drip inside (not just 2-3 drops a minute). Two years later, in 2006, also this box started to get very hot and I had to increase the water flow. Finally we started to suspect a misalignment of the engine, which proved to be the case. The treads on one of the engine mounts had worn out and that corner of the engine was lying roughly 18 mm (3/4") lower than it should. Once we fixed this by using a thick nut as washer below the foot of the engine the over heating problem was fixed. It had taken 3 years, 2 extra haul outs and about 1.000 dollars before finding the cause of the problem!
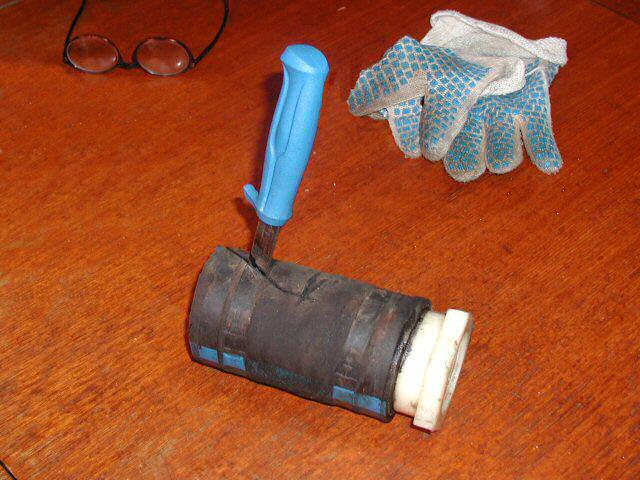
Sawing out the cutless bearing
The cutless bearing first appeared impossible to get out. I tried with a sledge hammer holding a piece of pipe, the same diameter as the bearing in between, but in vain. And I did not dare hitting too hard, afraid to harm the support of the strut. During that process I also tried by heating the strut first with a heat gun. |
|
| The hack saw assembled through the
bearing and strut |
Sawing slowly and patiently |


The solution this time was the hack saw, as seen on the photos above. This job took me some considerable time, being afraid to damage the body of the strut.
|
|
| I bent the end of the area between the
two grooves upwards and broke loose the slice using a narrow chisel |
From left: new stuffing box, old box,
slice
piece chiseled off and the inside rubber sleeve |


At the lower part of the bearing I cut two parallel grooves, about 8 mm apart and then used a chisel of the same width to break the slice loose. The "prezel" on the photo to the right above is that slice. So far so good. But just wait until it is time to to put in the new bearing!
Installing the new cutless bearing
I knew it was going to be a difficult job to push the new bearing into the strut, so I made some preparations. From the local Hurd's hardware store I bought a few simple components to manufacture a jack: a threaded iron bar (which I cut to suitable length), some big washers, two regular nuts and one long coupling nut. You can see the assembly on the picture to the left below, with the coupling a bit into the strut. Before I started I heated the strut with a heat gun and I had kept the bearing over night in a freezer, hoping to be able to shrink fit it into the strut. |
|
| Almost half the way in. |
Parts of a jack stand did the rest -
almost. |


All vent well until about half ways, but then the bearing refused to move any more. I wasn't able to get enough torque out of my tool. Then I got the idea to make a heavier jack of parts of a jack stand. The result is on the photo to the right above, with the bearing already almost all the way inside. Again, this worked very well, and for extra torque I used a long hollow steel bar as an extension to the turning handles.
|
|
| A piece of pipe completed the "True
Value" tool. |
If anyone wondered: This is a jack stand. |

However, when the bearing was all the way inside the strut, the handle had also reached the strut, of course, but I still had to get the bearing about 13 millimeters further inside. To do that I returned to the smaller jack and incorporated a piece of tubing of the same diameter as the inside of the strut, photo to the left above. To prevent the long screw from turning i drilled a hole through the nut at the lower end and used a steel wire to fix it to the chain seen in the picture. Then I was able to press in the bearing the remaining distance. Tada da daaa ..... Time for a well deserved beer.
Someone may wonder what a jack stand is. It is used to support the boats stored ashore and one can be seen on the photo to the right above.
The whole operation took one day's time.